

Wildlife Photography is about using visual storytelling to inspire change and beautiful wildlife images, foster conservation efforts, and promote appreciation for the natural world.
It is a thrilling and rewarding pursuit that allows you to capture the beauty and essence of the natural world. Whether you’re an avid nature enthusiast or a budding photographer, there’s something magical about freezing a moment in time and showcasing the stunning creatures that roam our planet.
Importance of Wildlife Photography
Through their lens, wildlife photographers serve as ambassadors for wildlife, helping to preserve Earth’s biodiversity for future generations. There are several important purposes:
Conservation Awareness: Wildlife photographs often capture the beauty and majesty of animals in their natural habitats, raising awareness about the importance of conservation efforts.
Education: Wildlife photographs offer insights into the behavior, habitat, and biology of various species. They can be powerful educational tools, teaching people about the diversity of life on Earth and the interconnectedness of ecosystems.
Artistic Expression: Stunning wildlife photographs inspire people to appreciate the natural world and motivate them to explore and connect with nature. They evoke emotions, sparking a sense of wonder and curiosity about the creatures that inhabit our planet.
Scientific Documentation: Wildlife Photographers often work closely with scientists to document animal behavior and contribute valuable data to research projects. Their photographs can provide crucial insights into species’ populations, distributions, and ecological interactions, aiding conservation efforts and informing scientific studies.
Economic Benefits: Wildlife Photography can have positive economic impacts by promoting nature-based tourism. Stunning images of wildlife and natural landscapes attract visitors to parks, reserves, and other natural areas, contributing to local economies and supporting conservation initiatives through ecotourism.
Environmental Advocacy: Wildlife Photographers often use their images to advocate for environmental protection and wildlife conservation. By sharing their work through exhibitions, publications, and social media, they raise awareness about pressing conservation issues and encourage action to address them.
Evolution of Wildlife Photography
The evolution has been a fascinating journey, reflecting advancements in technology, changes in photographic techniques, and shifts in societal attitudes toward conservation and the natural world.
Exploration & Documentation: In the early days of photography, Wildlife Photography was primarily about documenting exotic species encountered during exploratory expeditions.
Portable and Faster Camera: As camera technology advanced, Wildlife Photography gained access to smaller, more portable cameras and faster film speeds.
The Golden Age: In the mid-20th century, photographers used a combination of skill, patience, and technological innovation to create iconic images that captivated audiences and raised awareness about conservation issues.
Digital Revolution: The advent of Digital Photography Digital cameras offers numerous advantages over film, including instant feedback, higher ISO capabilities, and the ability to shoot in burst mode.
Specialization and Innovation: In recent years, advances in telephoto lenses, camera traps, and remote-trigger systems have allowed photographers to capture images of elusive and nocturnal species without disturbing them.
Conservation and Ethical Considerations: Many photographers use their images to raise awareness about conservation issues and advocate for the protection of wildlife and their habitats.
Social Media and Online Platforms: Social media and online platforms revolutionized by providing a global stage for photographers to share their work.
Future Directions: Future directions in wildlife photography will likely involve advancements in technology like AI-driven camera traps and drones, allowing for unprecedented access to wildlife without disturbance.
Challenges and Opportunities: Challenges include environmental threats, diminishing habitats, and ethical concerns about disturbing wildlife. Collaborations with scientists and conservationists can enhance the impact of preserving biodiversity.
Overall, the evolution of Wildlife Photography reflects a deepening appreciation for the natural world and a growing awareness of the importance of conservation. Today, wildlife photography continue to push the boundaries of the medium, using their images to inspire, educate, and advocate for the protection of Earth’s biodiversity.
Frequently Asked Questions On Wildlife Photography
How do I find wildlife to Photography?
Research wildlife hotspots in your area or visit national parks and nature reserves where animals are more likely to be found. Consider hiring a local guide who knows the area and its wildlife. Patience and observation are key—sometimes, the best shots come when you least expect them.
What are some Ethical Considerations?
Always prioritize the welfare of the animals. Avoid disrupting their natural behavior or habitat; never feed or approach them for a photo. Respect any regulations or guidelines in place to protect wildlife. Remember, your responsibility as a wildlife photography extends beyond capturing images.
How can wildlife photography contribute to conservation?
By raising awareness, promoting appreciation for nature, and documenting species and habitats, wildlife photography can inspire action for conservation.
In conclusion, Wildlife Photography is a rewarding journey that allows you to connect with nature and share its beauty with others. With the right gear, techniques, and mindset, anyone can capture stunning images of the creatures that inhabit our planet. Remember to approach this art form with respect, patience, and a deep appreciation for the natural world. So grab your camera, head into the wild, and let the adventure begin!
Capturing the Wild: A Beginner’s Guide to Wildlife Photography
Wildlife Photography is a fascinating and rewarding hobby, but it does require some specific knowledge and gear to get started. Here’s a guide to help you begin your journey:
1. Understanding your camera
Understanding your camera is crucial as it enables you to capture those fleeting moments effectively. Here, is how you can get to Understand Your Camera:
Know Your Camera Gear: Know your cameramodel, Understand your camera’s basic components – lens, sensor, controls, and settings.
Practice with Your Gear: Spend time practicing with your camera. Experiment with different settings and modes to understand how they affect your photos. Needs to Read the manual thoroughly to understand all its features and settings.
Image Stabilization: Learn how to enable or disable image stabilization and when to use it. It’s crucial, especially when shooting handheld with long lenses.
Custom Settings: Customize your camera’s buttons and functions to access frequently used settings quickly.
Review and Learn:
- After each shoot, review your photos to see what worked and what didn’t. Learn from your mistakes and successes.
- Share your photos with other photographers to get feedback and learn new techniques.
- Keep learning about Wildlife photography techniques and your camera’s capabilities.
- Attend workshops to learn from professionals and other photographers.
Practice, patience and a deep understanding of your camera are key to capturing stunning wildlife images. The more you practice and experiment, the better you’ll become at capturing stunning Wildlife Photographs.
- Choose the Right Gear
Choosing the right gear is essential for capturing stunning Wildlife Photographs. Here are certain things that a photographer needs to know while choosing the right gear:
- Camera: While a DSLR or mirrorless camera is ideal, even high-end smartphones can capture decent wildlife photos. However, for serious wildlife photography, invest in a camera with good autofocus capabilities and a fast burst rate.
- Lenses: A telephoto lens is essential to capture distant subjects. A focal length of lens needs at least 300mm which is recommended, but 400mm or 500mm lenses are even better.
- Tripod and Monopod: For stability, especially with heavy telephoto lenses, a tripod or monopod can be invaluable.
- Camera Bag: Invest in a good quality, comfortable camera bag to carry your gear in the field.
- Backup and Maintenance: Always carry spare batteries and memory cards. Keep your gear clean and well-maintained to ensure it performs optimally.
- Invest in the Right Gear: While you don’t need the most expensive equipment, having a decent camera and lens is essential. A DSLR or mirrorless camera with a telephoto lens (200mm or longer) is ideal for capturing distant subjects without disturbing them.
3. Planning Your Shoots
Planning your shoots is crucial for maximizing your chances of capturing great shots. Here’s a step-by-step guide to help you plan your next adventure:
1. Learn about Wildlife Behavior
Understanding the behavior of the animals you want to photograph is crucial. Knowing their habits, movements, and habitats will help you anticipate their actions and capture better shots.
2. Research Your Subject
Choose Your Target Species, do some research, and decide which wildlife species you want to photograph.
3. Select the Right Location & Time
Research Wildlife Hotspots and Use online resources, guidebooks, and local knowledge to identify prime wildlife locations. Consider the Season as some certain species may be more active during specific seasons or times of day.
4. Check Weather Conditions
Always Check the weather forecast for your chosen location. Bring appropriate clothing and gear for the weather conditions you’ll encounter.
5. Utilize Golden Hours
Aim to shoot during the Golden Hours of sunrise and sunset for soft, warm light. Midday light can be harsh, so plan your shoot for early morning or late afternoon.
6. Scout the Location
If possible, scout the location before your shoot to familiarize yourself with the area. Look for vantage points and areas where wildlife is likely to be active.
7. Pack Your Gear
- Camera and Lenses: Choose the appropriate camera body and lenses for your subject and shooting conditions.
- Tripod and Monopod: Bring stability support for sharp images, especially with long lenses.
- Backup Batteries and Memory Cards: Ensure you have enough storage and power for your entire shoot.
8. Be Prepared for Field Conditions
Wear comfortable clothing and appropriate footwear for the terrain and weather. Bring water and snacks to stay hydrated and energized during your shoot.
9. Plan Your Approach
- Be Patient: It takes time to get the perfect shot. So here a Wildlife Photographer has to be patient. Be prepared to spend time waiting for the perfect shot.
- Respect Wildlife: Approach animals cautiously and avoid disturbing their natural behavior.
10. Set Up Your Equipment
- Configure Camera Settings: Set your camera to the appropriate exposure settings for your shooting conditions.
- Pre-focus: Pre-focus your lens to the distance where you expect the wildlife to be.
11. Be Flexible
- Adapt to Changing Conditions: Wildlife behavior and environmental conditions can change quickly. Be prepared to adjust your plans accordingly.
- Stay Open to Opportunities: Be ready to capture unexpected moments and subjects.
12. Enjoy the Experience
- Immerse Yourself in Nature: Take time to appreciate the beauty of the natural world around you.
- Learn from the Experience: Every shoot is a learning opportunity to improve your skills as a wildlife photographer.
By following these steps and planning your shoot carefully, you’ll be well-prepared to capture stunning images of nature’s wonders.
4. Field Techniques
Field Techniques are essential for capturing stunning Wildlife Photography. Here are some techniques to help you improve your skills in the field:
Patience and Observation: Spend time observing your subjects to anticipate their behavior. Learn about the behavior of the species you’re photographing to predict their movements.
Stay Quiet and Low: Avoid sudden movements and loud noises that could startle wildlife. Shoot at eye level with your subject for more engaging and intimate shots.
Use Natural Light: Shoot during the Golden Hours of sunrise and sunset for soft, warm light. Pay attention to the direction and quality of light for the best results.
Frame Fill: Get as close to your subject as possible to fill the frame and capture details. Make sure there’s enough space around your subject to avoid cluttered compositions.
Background Consideration: Use a wide aperture to blur the background and make your subject stand out. Look for clean backgrounds that won’t distract from your subject.
Understanding Depth of Field (DOF): DOF is the area in focus in your image. In wildlife photography, you often want a shallow DOF to isolate your subject from the background, achieved with a wide aperture.
Practice Ethical Photography: Keep a safe distance from wildlife to avoid causing stress or disturbance. Obey park rules and regulations, and never interfere with or feed wild animals.
Be Ready for Action: Be ready to capture sudden movements or behaviors. Use burst mode to capture a series of shots for action sequences.
Learn from Others: Join photography forums, watch tutorials, or take workshops to learn from experienced wildlife photographers. They often share valuable tips and techniques.
Stay Safe: Be aware of your surroundings and potential hazards like uneven terrain or other wildlife. Be prepared for changing weather conditions and know when to retreat if conditions become dangerous.
Respect for Wildlife: Always prioritize the safety and well-being of wildlife. Respect their space and avoid disturbing them for the sake of a photo.
5. Camera Techniques
A photographer must know the Camera Techniques. Here are some Camera Techniques in brief:
Know Your Gear & Practice: Practice using your camera’s settings and controls so you can adjust them quickly in the field. Keep your camera ready with appropriate settings for quick shots.
Pre-focus and Anticipation: Pre-focus your lens on where you expect the subject to be and be ready to capture the action when it happens.
Composition Rules: Compose your shots using the Rule of Thirds for more dynamic images. Leave space around your subject to create a sense of openness and freedom.
Exposure Compensation: Exposure determines how light or dark your photos will be. Learn how to use exposure compensation to adjust exposure when shooting in challenging lighting conditions.Understand the exposure triangle: aperture, shutter speed, and ISO.
- Aperture: Controls the amount of light entering the lens. A wider aperture (lower f-number) lets in more light, ideal for low-light conditions or when you want a shallow depth of field.
- Shutter Speed: Determines how long the camera’s sensor is exposed to light. Faster shutter speeds are crucial for capturing fast-moving wildlife.
- High ISO Performance: Determines the camera’s sensitivity to light. Higher ISO values are useful in low light, but they can introduce noise/grain into your images. Know how high you can Understand your Camera’s ISO Performance without sacrificing too much image quality. This is important for shooting in low-light conditions.
Autofocus Modes: Your camera likely has different autofocus modes. For wildlife, continuous autofocus (AI-Servo for Canon, AF-C for Nikon) is often used, as it tracks moving subjects. Use AF-C for wildlife to continuously focus on moving subjects.
Burst Mode: Understand your camera’s drive modes, particularly burst mode (continuous shooting). This allows you to take multiple shots in rapid succession, useful for capturing wildlife in action.
Stay Steady: Use a tripod or monopod to stabilize your camera, especially with long lenses, and avoid camera shake.
6. Post-Processing
Post-Processing is essential, helping to enhance your images and bring out the best in your captures. Here are some useful Post-Processing Techniques:
A. Organizing Your Photos
File Management Systems: In post-processing, organize your files systematically. Create folders for each shoot or location, subdivided by date or subject, and use file names. This system streamlines workflow, ensures easy access to images, and maintains an organized archive for future reference.
Using Metadata: Using Metadata involves embedding information into image files. This includes details like camera settings, date, and location.
Contrast Sharpening: Apply global sharpening to the entire image, and use local sharpening for specific areas. Use sharpening masks to protect smooth areas from being over-sharpened.
B. Basic Editing
Cropping & Emphasize Subject: Use cropping to improve composition and remove distracting elements. Crop to Emphasize the Subject and bring it closer to the viewer.
Exposure Adjustments: Adjust exposure to correct underexposed or overexposed areas. Recover details in overexposed highlights and underexposed shadows.
Custom White Balance: Understand how to set a custom white balance to ensure accurate color reproduction. Different lighting conditions can affect the color temperature of your photos. Use appropriate white balance settings or shoot in RAW to adjust it later in post-processing.
C. Advanced Editing Techniques
Experimentation and Practice: Experiment with Different Techniques. Try out different post-processing techniques to find what works best for your style. The more you practice, the more proficient you’ll become in post-processing.
Color Enhancements: Adjust vibrant and saturation to enhance colors without oversaturating.Target specific colors to adjust their hue, saturation, and luminance.
Noise Reduction: Apply noise reduction to reduce digital noise, especially in high-ISO images.Adjust noise reduction settings to preserve detail while reducing noise.
Lens Corrections: Correct lens distortion and vignetting for a cleaner, more natural look. Remove chromatic aberration to eliminate color fringing.
Retouching: Use adjustment brushes or graduated filters for selective editing.Target specific areas to fine-tune exposure, color, and contrast.
Create Presets & Batch Processing: Develop presets for common adjustments to speed up your workflow.Apply adjustments to multiple images simultaneously for efficiency.
Final Touches: Zoom in to ensure Image Quality and detail. Set export settings for web or print, considering resolution, file format, and compression.
Creative Effects:
- Vignetting: Add or remove vignetting to draw attention to the subject.
- Split Toning: Apply split toning for subtle color grading effects.
- Adding Texture: Enhance texture in fur, feathers, or other details.
Remember, the goal of Post-Processing is to enhance your images while maintaining their natural look. Avoid over-processing, and strive for a balance that brings out the best in your Wildlife Photography.
Frequently Asked Questions On Wildlife Photography Guide
What post-processing techniques should I use?
Basic editing involves adjusting exposure, contrast, and sharpness, while advanced techniques may include retouching and color correction.
How do I approach wildlife safely?
Approach slowly and quietly, respect their space, and avoid sudden movements to prevent startling or stressing the animals.
How can I improve my composition?
Use the rule of thirds, consider the background, and experiment with different angles to create visually appealing compositions.
How can I share my wildlife photography?
Share your photos on social media, create an online portfolio, and consider submitting them to wildlife photography contests or exhibitions.
The Best Camera for Wildlife Photography
When it comes to Wildlife Photography, choosing the right camera is crucial for capturing fast-moving subjects in challenging conditions. Here are some types of cameras commonly used for wildlife photography:
1. DSLR (Digital Single Lens Reflex) Cameras:
- DSLRs are popular among wildlife photographers due to their versatility, fast autofocus systems, and compatibility with a wide range of lenses.
- They offer interchangeable lenses, allowing photographers to use telephoto lenses for capturing distant wildlife photography.
- DSLRs typically have larger sensors, which provide better image quality, especially in low-light conditions.
- Examples: Canon EOS 5D Mark IV, Nikon D850, Sony Alpha a99 II.
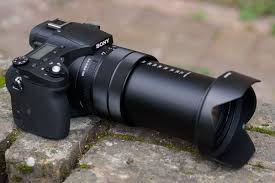
2. Mirrorless Cameras:
- Mirrorless cameras have gained popularity for wildlife photography due to their compact size, lighter weight, and advanced features.
- They use electronic viewfinders (EVFs), providing a real-time preview of exposure and depth of field, which can be beneficial for wildlife photography.
- Mirrorless cameras often have fast autofocus systems and continuous shooting speeds, making them suitable for capturing action shots.
- Examples: Sony Alpha a7R IV, Fujifilm X-T4, Panasonic Lumix GH5.
3. Superzoom Cameras:
- Superzoom cameras, also known as bridge cameras, offer an all-in-one solution with an extensive zoom range.
- These cameras have built-in lenses with very long zoom ranges (e.g., 50x, 65x), making them suitable for capturing distant wildlife without the need for additional lenses.
- Superzoom cameras are compact and lightweight, making them convenient for travel and outdoor Wildlife photography.
- Examples: Nikon Coolpix P1000, Canon PowerShot SX70 HS, Sony Cyber-shot RX10 IV.
4. Action Cameras:
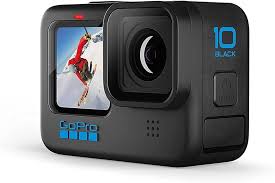
- Action cameras are small, rugged, and designed for capturing fast-paced action in extreme conditions.
- While they may not offer the image quality of DSLRs or mirrorless cameras, action cameras are great for capturing wildlife photography in situations where larger cameras might be impractical.They often come with features like waterproofing, shock resistance, and built-in stabilization.
- Examples: GoPro HERO9 Black, DJI Osmo Action, Insta360 ONE R.
5. Medium Format Cameras:
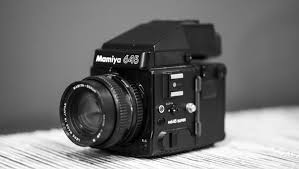
- Medium format cameras offer larger sensors than DSLRs and mirrorless cameras, providing exceptional image quality and detail.
- While less common due to their higher cost and larger size, medium format cameras are used by some wildlife photographers who prioritize image quality above all else.
- Examples: Fujifilm GFX 100, Hasselblad X1D II 50C, Phase One XF IQ4.
The choice of camera depends on factors like budget, desired features, portability, and specific shooting conditions. Many wildlife photographers opt for DSLRs or mirrorless cameras due to their combination of image quality, autofocus performance, and lens flexibility.
Frequently Asked Questions On the Best Camera for Wildlife Photography
What equipment do I need for wildlife photography?
Essential gear includes a DSLR or mirrorless camera, telephoto lens, tripod, and accessories like memory cards and batteries.
What camera settings should I use?
Use fast shutter speeds to freeze motion, wide apertures for a shallow depth of field, and adjust ISO for optimal exposure.
Which Camera Settings are best for Wildlife Photography?
Start with a wide aperture (around f/5.6 to f/8) to achieve a shallow depth of field and isolate your subject. Use a fast shutter speed (1/500s or faster) to freeze motion, especially for fast-moving animals. Adjust ISO as needed to maintain proper exposure, but keep it as low as possible to minimize noise.
Recommended Books and Resources:
- “Understanding Exposure” by Bryan Peterson
- “The Art of Bird Photography” by Arthur Morris
- “The National Geographic Field Guide to Wildlife Photography: Digital” by Rob Sheppard
- Online tutorials and courses on platforms like Udemy, Skillshare, and YouTube.
Remember, the journey of Wildlife Photography is as exciting as the photographs themselves. Enjoy the process and the beautiful moments you’ll capture along the way! Overall, Wildlife Photography plays a vital role in fostering appreciation for the natural world, promoting conservation efforts, and inspiring people to become stewards of the environment.
